Package managers

Basic commands HPC Launch https://hds-sandbox.github.io/HPC-lab/

Alba Refoyo
Jennifer Bartell

2025-04-15

Software management on UCloud

  • Every app comes with its pre-defined installed software on UCloud

  • The Terminal app has no preinstalled (bio)software

  • You can install and manage your software and its dependencies using virtual environments

Virtual environments

Each project needs specific software versions dependent on each other for reproducibility - without interfering with other projects.

Definition

A virtual environment keeps project-specific software and its dependencies separated.

A package manager is a software that can retrieve, download, install, and upgrade packages easily and reliably.

Conda

Conda is both a virtual environment and a package manager.

  • easy to use and understand
  • can handle quite big environments
  • environments are easily shareable
  • a large archive (Anaconda) of packages
  • active community of people archiving their packages on Anaconda

A package manager puts together the dependency trees of requested packages to find all compatible dependency versions.

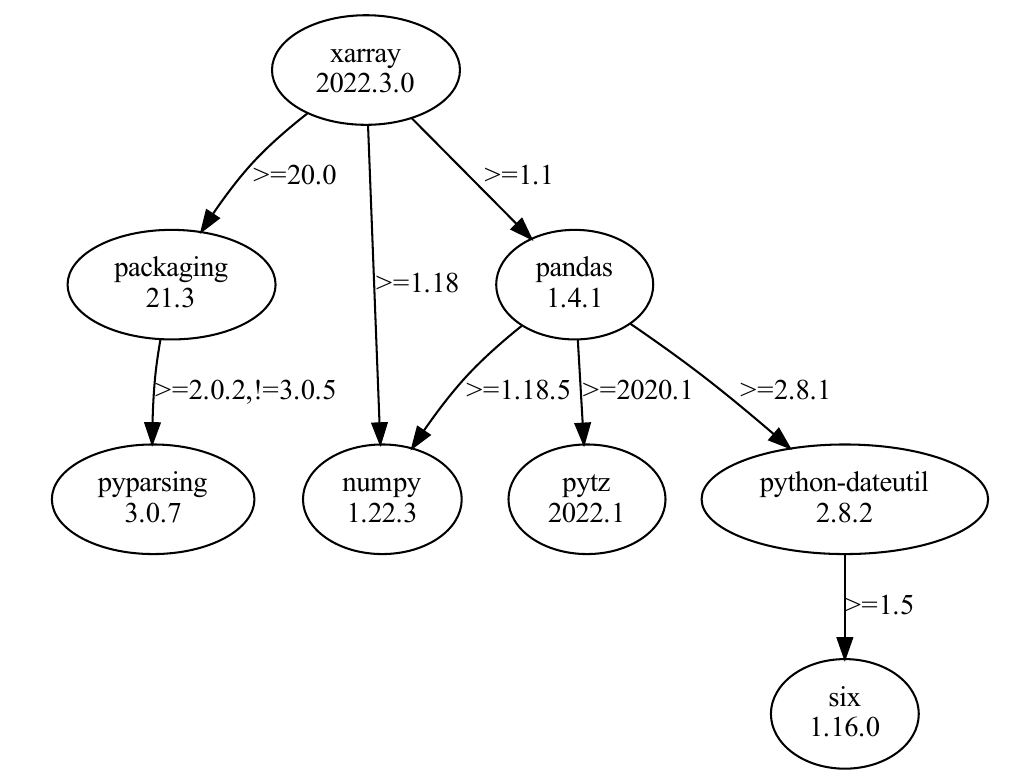
Figure: A package’s dependency tree with required versions on the edges

To install a specific package in your environment, search for it on anaconda.org:
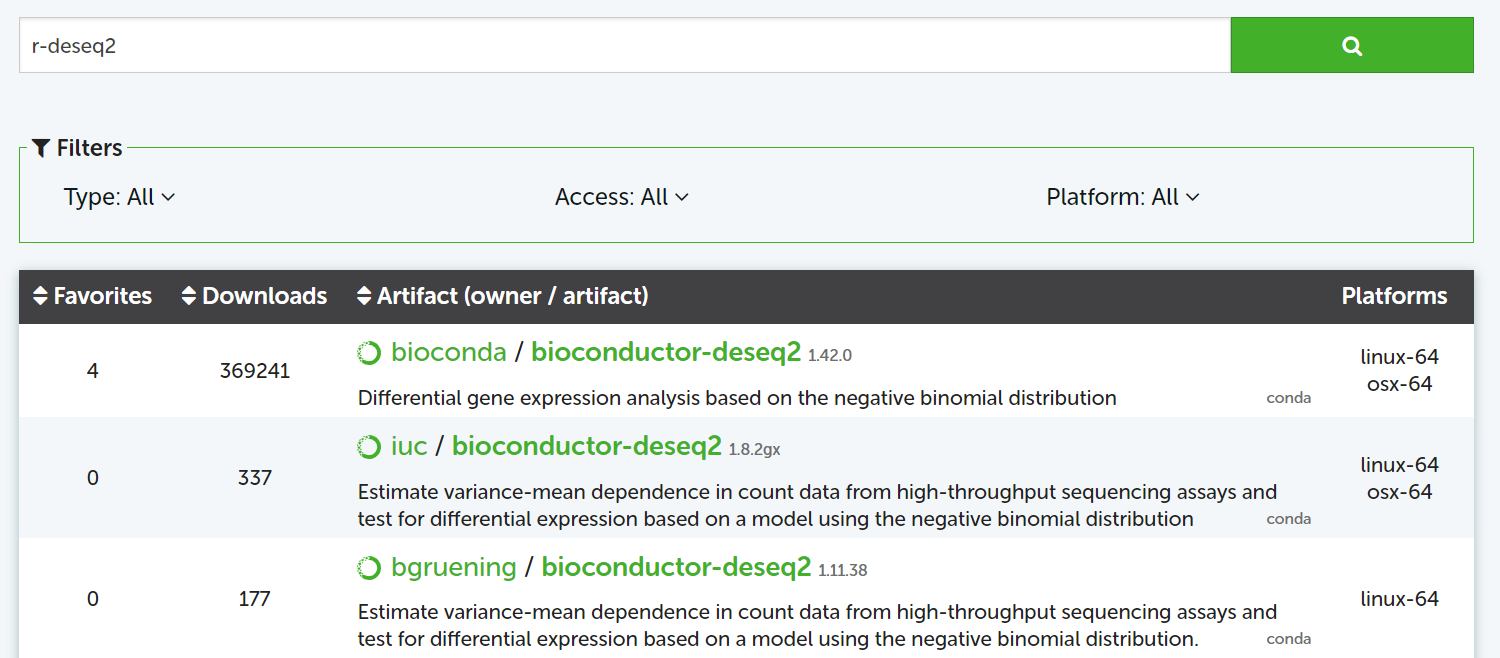
Channels

Packages are archived in channels. conda-forge and bioconda include most of the packages for bioinformatics and data science.

conda-forge packages are often the most up-to-date.

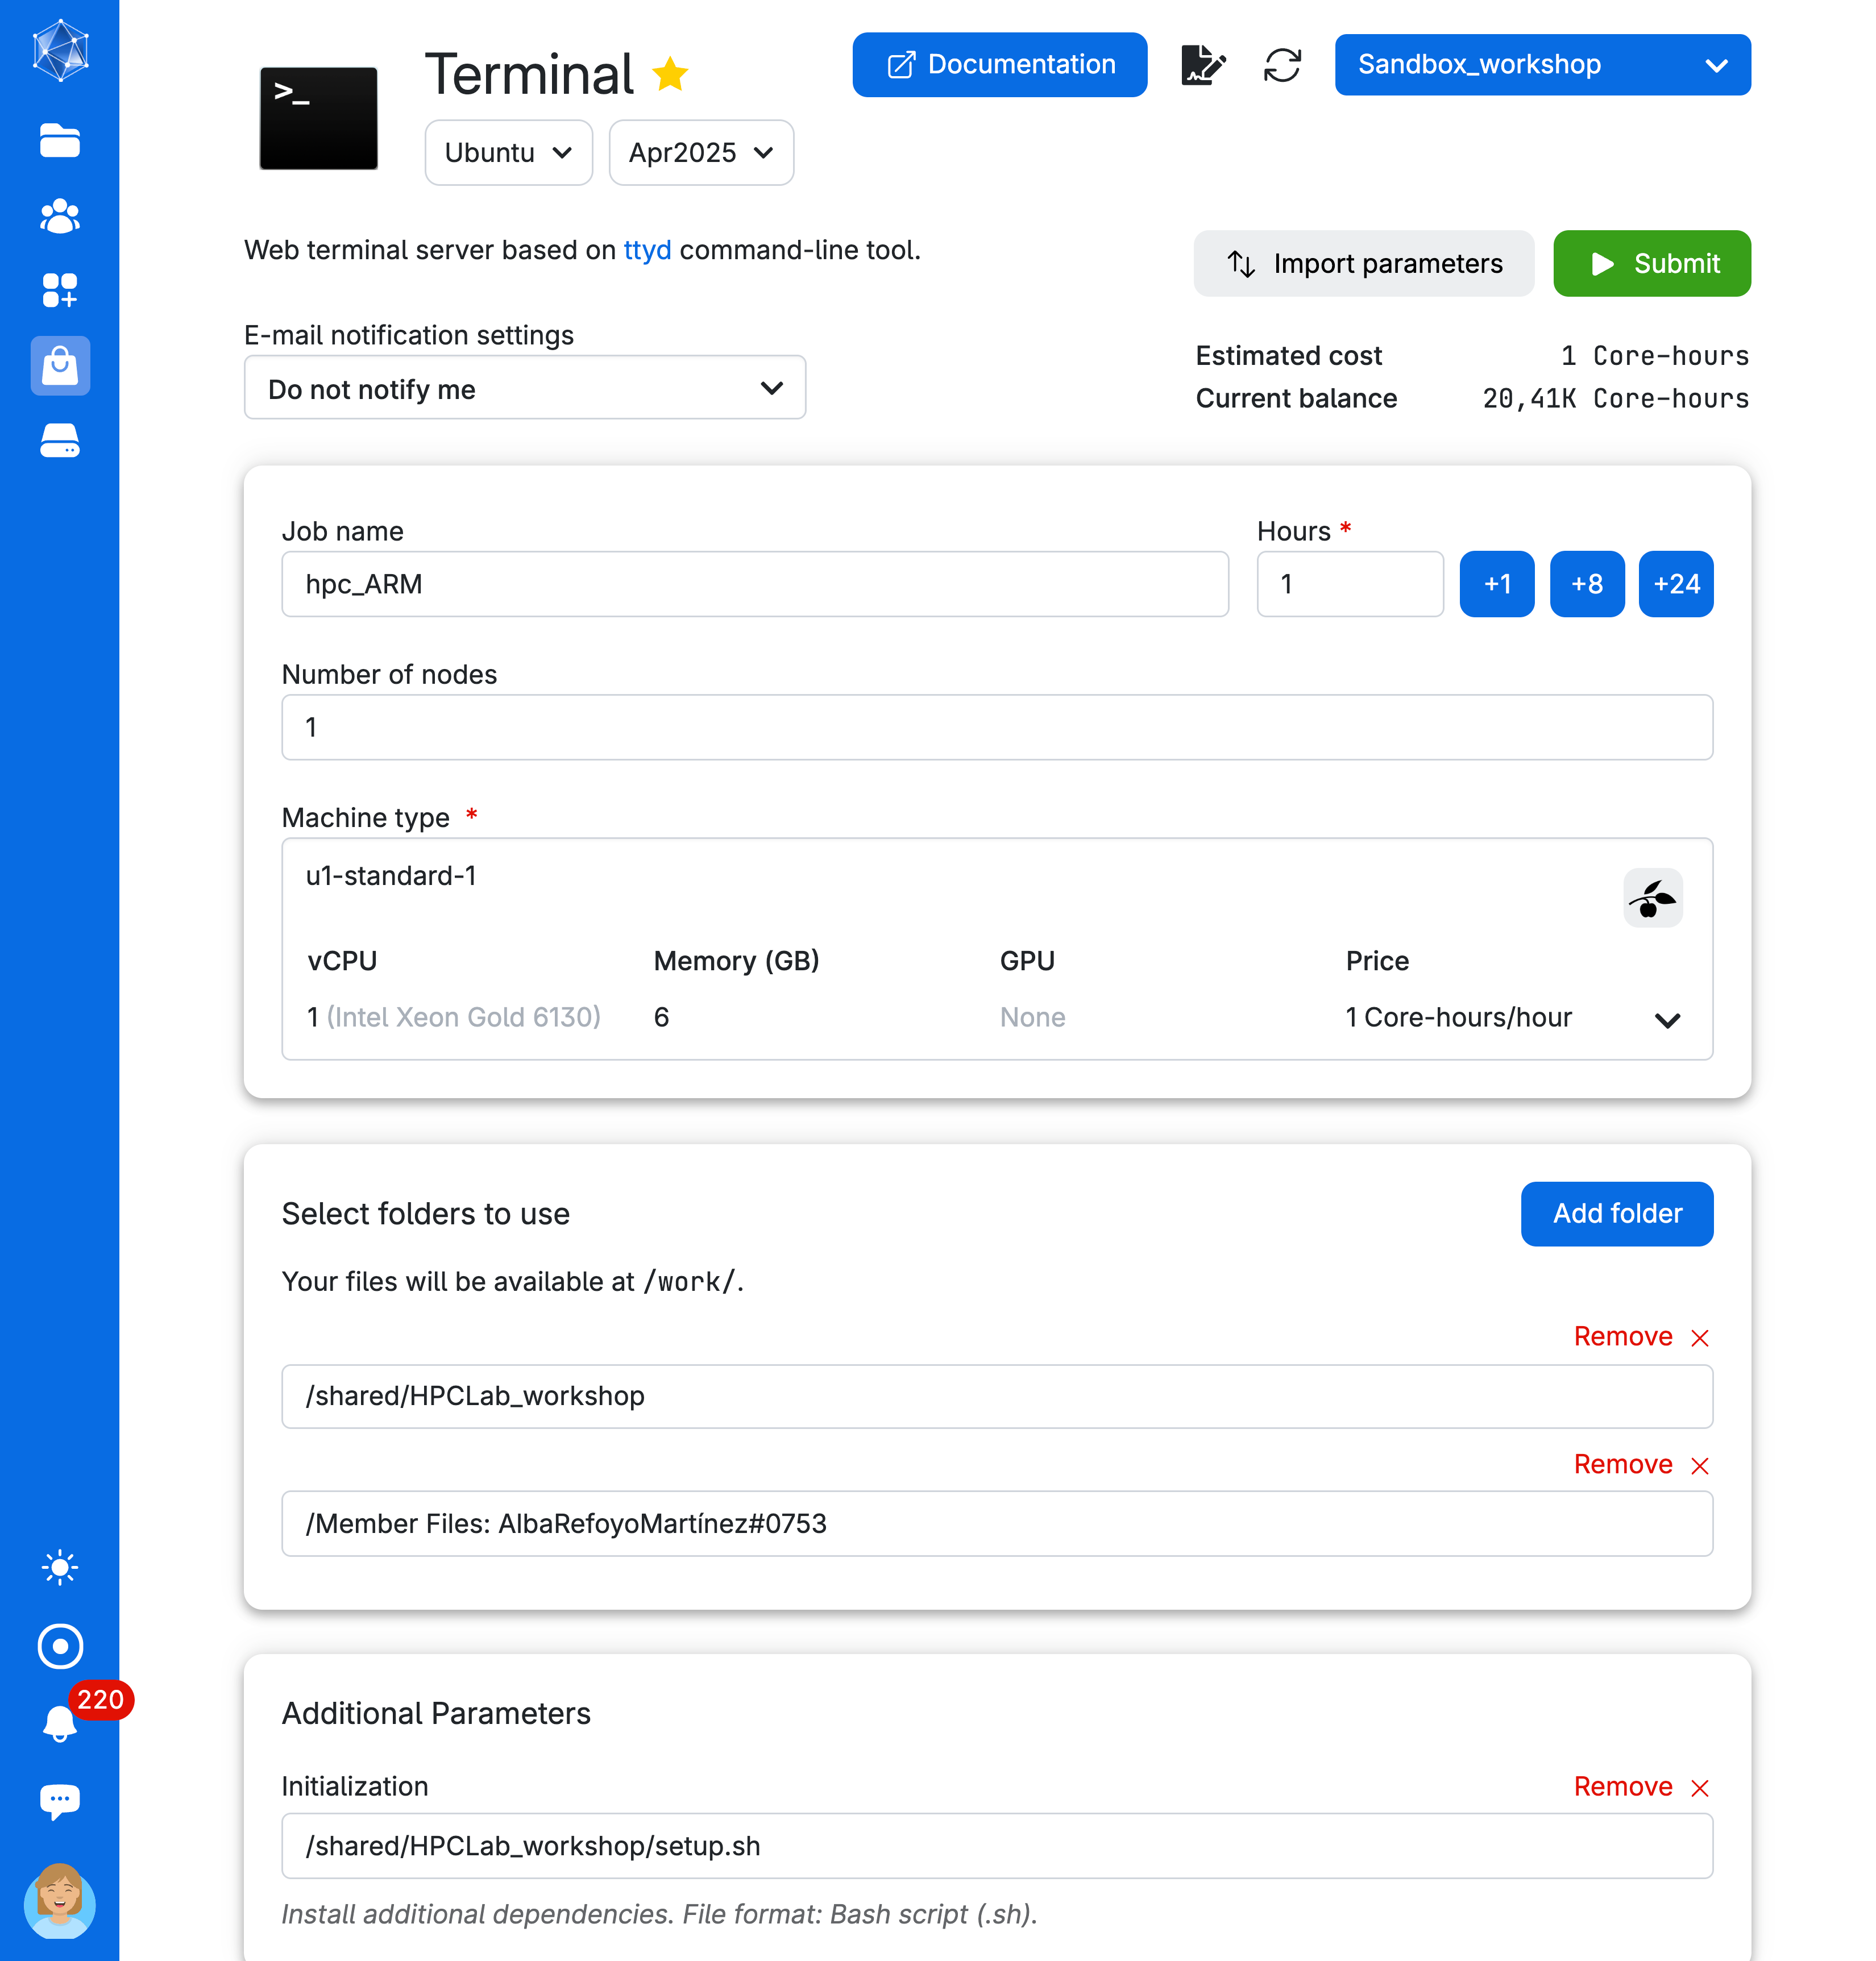
Part 1. Exploring an existing environment

Let’s open the Terminal app. Since Conda is not pre-installed in the Terminal app on UCloud, we will need to:

  1. Mount a drive with a pre-installed Miniconda setup.
  2. Run a bash script to add conda to the search path.

We will run the following commands to get familiar with Conda environments.

  • What is the conda version?
conda info
  • Check the name of all the different environments available to you.
conda env list
  • Let’s explore one of the environments. To do this, let’s activate hpclab-env environment
conda activate hpclab-env
  • How many packages are available in this environment?
conda list |grep -v '#' | wc -l

Imagine you need to share your environment with a collaborator so they can replicate your analysis. How do we do this?

  • Export the environment specifications and save them to your personal drive (e.g., .yml)
conda env export --from-history > <yourname-hpclab>.yml
  • Deactivate the environment.
conda deactivate

Part 2: Building your conda environment

Let’s create a new directory in your personal drive:

cd <path-to-personal-drive>
mkdir envs 

Now, add a new environment using the argument --prefix PATH (e.g., /work/<YourNameSurname#xxxx>/envs/<name-env>). We need to do this as miniconda is installed in a directory that you don’t have write rights to.

Locally, you would typically run the command: conda create --name <myenv>

Warning

Always specify the location using --prefix PATH regardless of the UCloud app you use, especially if the app has conda pre-installed (e.g. Jupyterlab). The path must be on your personal drive or a shared drive with colleagues that you have access to. Otherwise, the environment won’t be saved, as you’re working within a temporary container instance.

  • Create the environment
conda create --prefix /work/<NameSurname#xxxx>/envs/<test-env>
  • Confirm the environment location
Proceed ([y]/n)? y
  • Double-check that the new environment exists
conda env list
  • Activate the env
conda activate <myenv>
  • By default, we won’t have conda-forge or bioconda added to the environment. Let’s fix this.
conda config --remove channels defaults
conda config --add channels bioconda 
conda config --add channels conda-forge
  • Add the latest Python version to the environment
Search available versions
conda search python 
Install the latest
conda install python=3.13.2 
  • Install samtools, a tool for manipulating DNA sequencing data
conda install -c bioconda samtools
  • Uninstall samtools
conda remove samtools 
  • Deactivate your environment
conda deactivate