UCloud
Accessing the Sandbox on UCloud
High-Performance Computing (HPC) is crucial for researchers because it provides the computational power necessary to tackle complex and data-intensive problems. HPC systems, with their advanced processing capabilities, allow researchers to perform tasks that would be impractical or impossible with standard computers. UCloud is one such example, designed to be user-friendly with an intuitive graphical interface. It is flexible and extensible to handle multi-scale, multi-disciplinary research challenges, making complex digital technology accessible to all users.
User accounts on UCloud are enabled by university login credentials using WAYF (Where Are You From). Access the WAYF login portal here, and then find your affiliated Danish university using the search bar. After login, we suggest setting up Two Factor Authentication by clicking on the icon in the top-right corner of the screen. Once you are an approved user of UCloud, you can access the Sandbox environment via different ‘Sandbox’ apps linked to topical modules that you deploy using your own storage and computing resources - just go to Apps once you have signed into UCloud and search ‘Sandbox’ to find what we have deployed. Each app page has its own Documentation link that will direct you to Sandbox-based usage guidelines which may be customized to the app’s particular tools and scope. Apps will feature various modules that you can select initially, creating a personal copy of the training materials in your workspace for you to edit.
Each Danish university has its usage relationship with UCloud as governed by their local front office of DeiC - check with your university IT support / DeiC representatives about requesting computational resources. For example, the University of Copenhagen has previously allotted an initial chunk of free UCloud compute hours to staff (from PhD students to professors as well as non-academic staff). If you have further questions about getting compute resources, please contact Sandbox staff.
Extensive documentation on the general use of UCloud (how to use apps and run jobs, etc.) is available in the UCloud user guide.
Click on the images to view them in full size.
Example: how to open a Sandbox app
Step 1
Log onto UCloud at the address http://cloud.sdu.dk using university credentials.
Step 2
When you are logged in, choose the project from the dashboard (top-right side) from which you would like to utilize compute resources. Every user has their personal workspace (My workspace). You can also provision your own project (check with your local DeiC office if you’re new to UCloud) or you can be invited to someone else’s project. If you’ve previously selected a project, it will be launched by default. If it’s your first time, you’ll be in your workspace. If you’ve joined one of our courses or workshops, your instructor will let you know which to choose.
For this example, we select Sandbox RNAseq workshop.
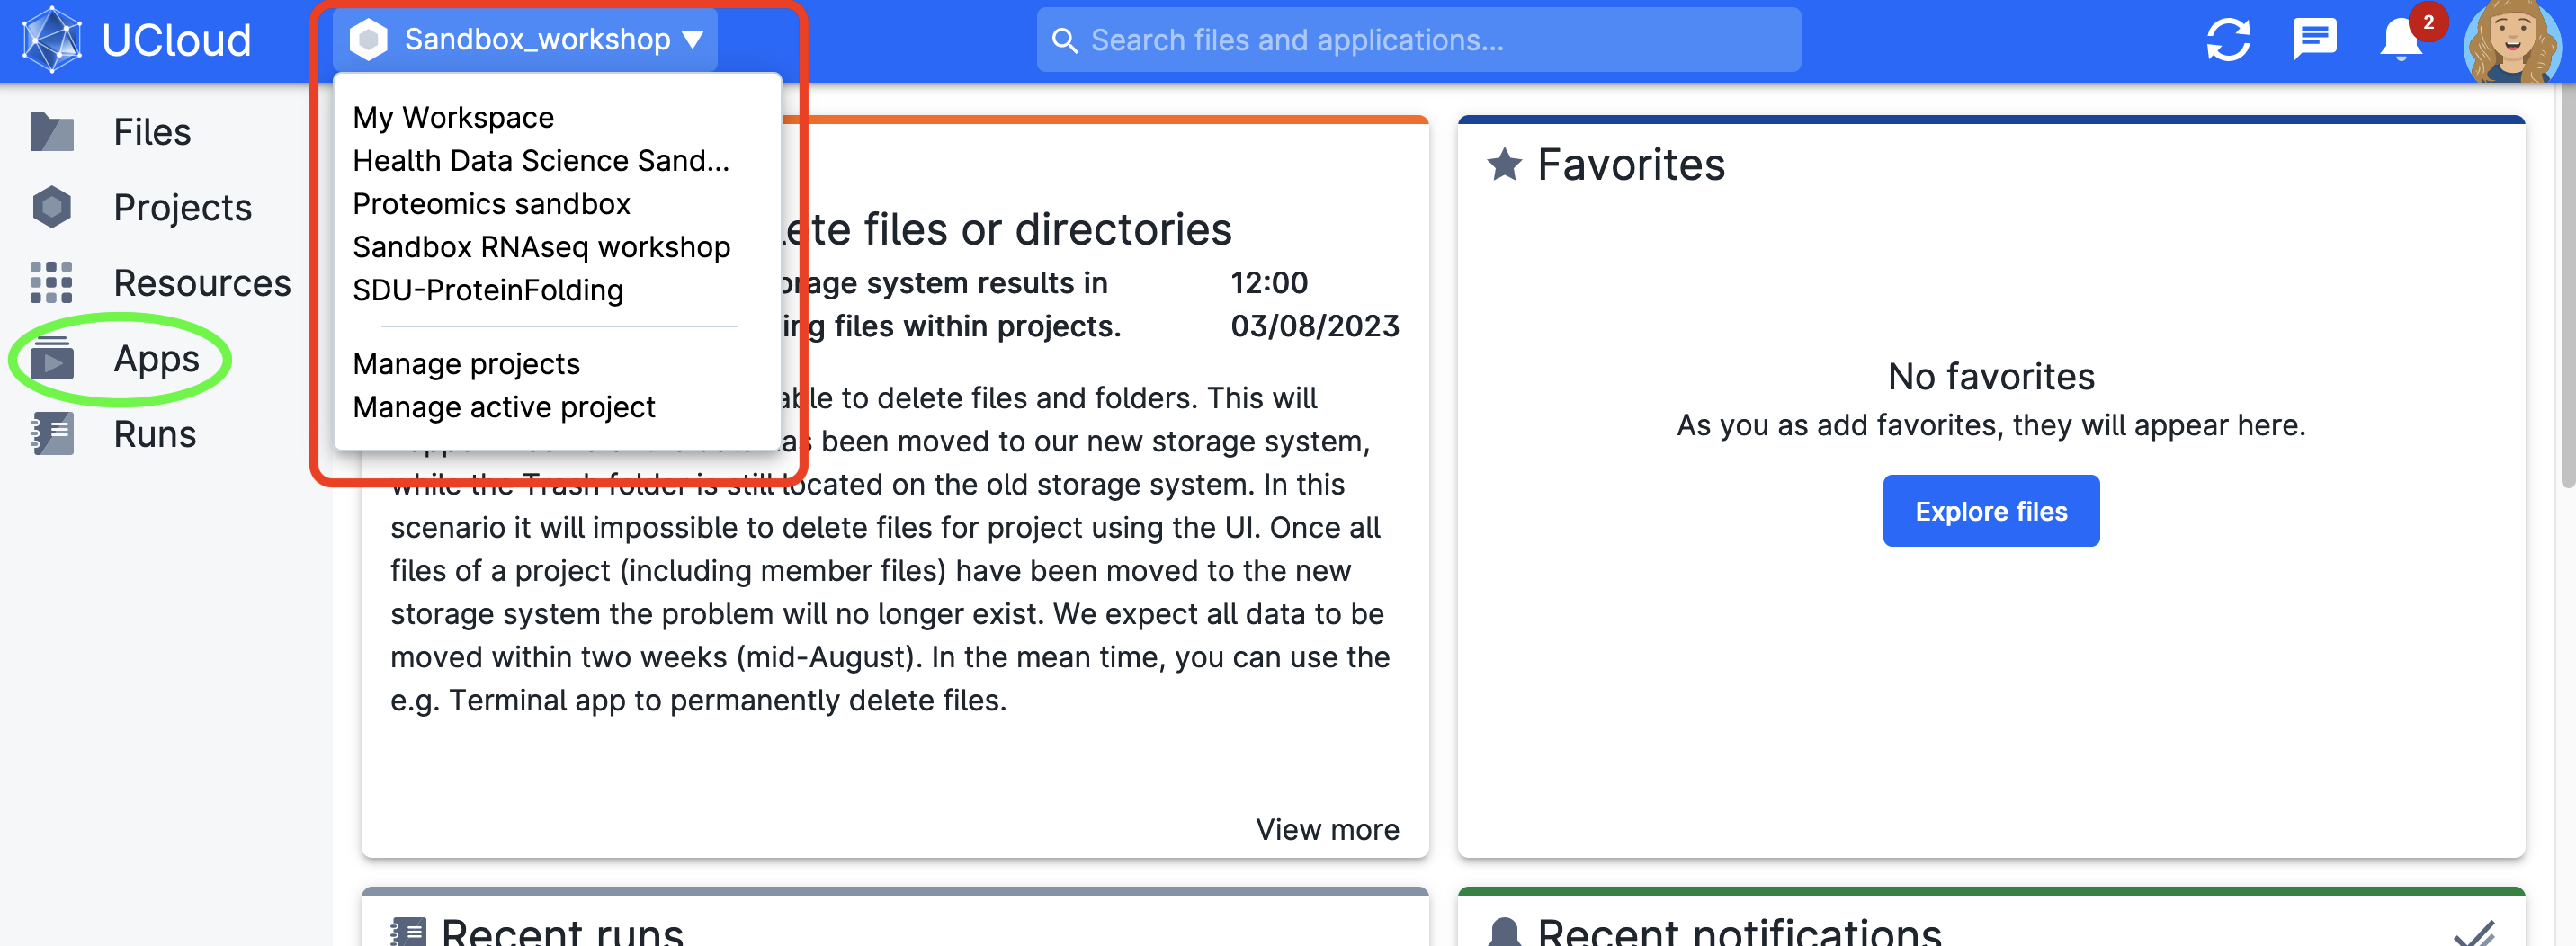
On the left side, you can see the structure of the project (content changes when you select a different project):
- Files: all folders/files you have access to. You can navigate through folders, download, upload, or share files with collaborators. You might have varying rights across folders, mostly depending on whether they are yours or have been shared with you
- Project: details
- Resources: allocated to your workspace or a project (shared)
- applications: gain access to the apps catalog on ucloud. We refer to apps as the software applications that can be deployed on the cloud. It’s recommended to explore the featured ones. Use the search bar to find the sandbox apps
- Runs: from where you submit your jobs and past runs information
Don’t forget to accept the invitation to access new projects. Remember to switch projects to access other files and resources. Test switching among projects and observe how the dashboard changes.
At the bottom left corner, you will find your user ID, which you may need to provide once the course starts or for future collaborations, such as being added to other people’s projects. You can also find it on UCloud docs.
![]()
In the dashboard, you will also find news and UCloud releases, recent runs, resources allocations, and other notifications between other applications:
- Resource allocations: indicate your currently allocated resources (e.g., KU employees have access to 1000kr in computing).
- Grant applications: apply for more resources (computing or storage if you run out of them)
Step 3
Then click on Apps in the left panel to investigate what tools and environments you can use (orange square). The easiest way to find Sandbox resources is to search via the toolbar (red circle). In this example, we’ll select the Genomics Sandbox (which will bring you to the submission screen).
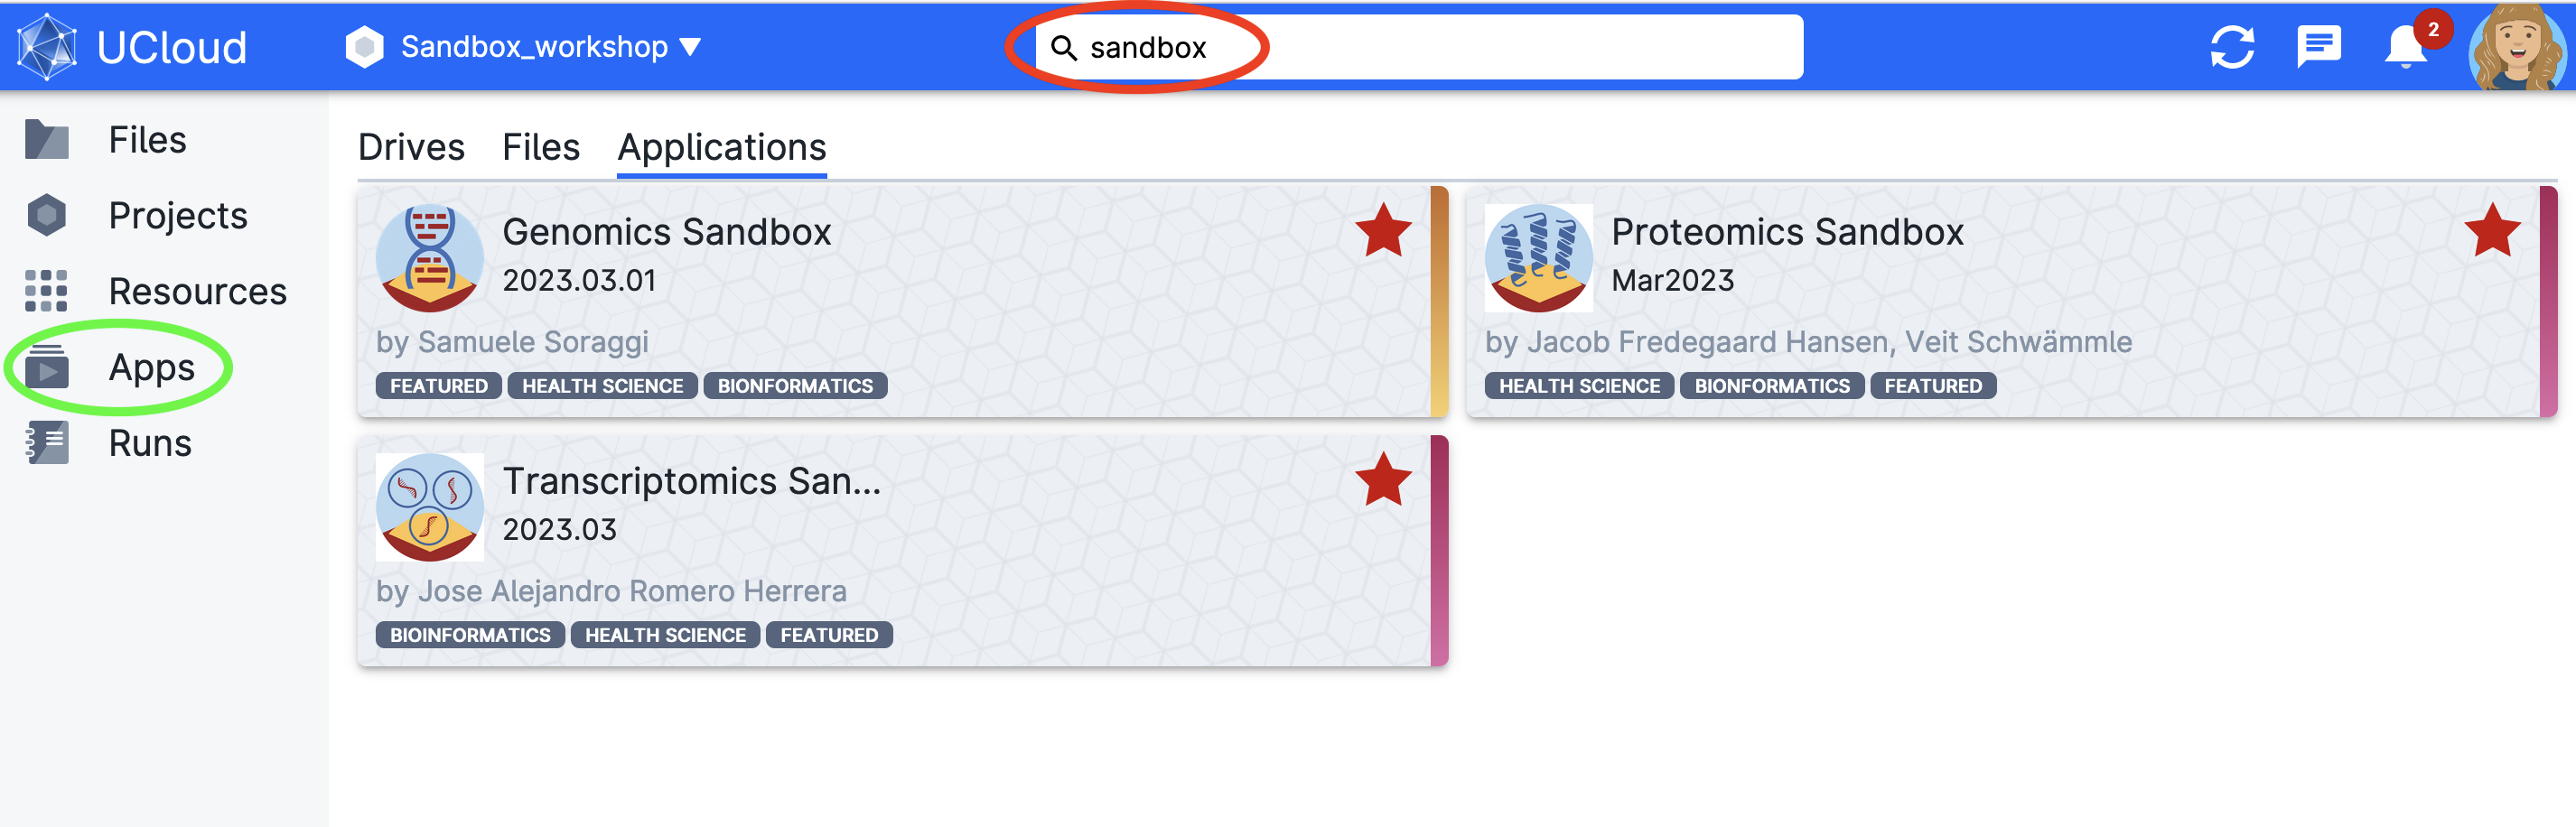
Mark them as favorites so they appear on your dashboard.
Step 4
Click on the app button to get into the settings window. First, we recommend reading the documentation of the app (step 2). Then, you can configure the app as shown below, or be provided with a configuration file made available in a workshop’s project folders (import parameters) which will take care of everything for you.

In this example, we configure our session by:
- Name and version of the app to run
- Read the documentation before using any app
- Import parameters (from previous runs or JSON files tailored for the app)
- Job settings: enter a job name (descriptive of the task), select the time (in hours) we want to use a node for (it can be modified afterwards!) and the machine type (selecting a 4 CPU standard node with 24 GB memory)
- Optional: add folders to access while in this job (e.g.:
/home) - Choose the module in the app you want to run (some apps have several modules that load different notebooks and data)
- Click on the
Submitbutton (and wait!)
Step 4 sets up our computing resources for the period we want to work and can be customized as needed. However, only the time can be modified after submitting the job. For some of the Sandbox apps, you might want to select folders (Home and the Notebooks/Data from the module to avoid downloading it every time you start a new job). If you are in doubt, read the documentation specific to the app you are interested in.
Select the version of the app (if in doubt, use the latest one). This allows you to run specific versions of software.
There are different types of apps, and therefore, interfaces. Some, like RStudio or Jupyter Notebooks, have their own graphical user interface, whereas others are command-line interfaces. Lastly, you can also deploy a virtual desktop and virtual machine, which allow you to spin up a virtual computer.
Step 5
Wait to go through the queue. When the session starts, the timer begins to count down. In a couple of minutes, you should be able to open the interface through the button (Open interface) in a new window (refresh the window if needed).
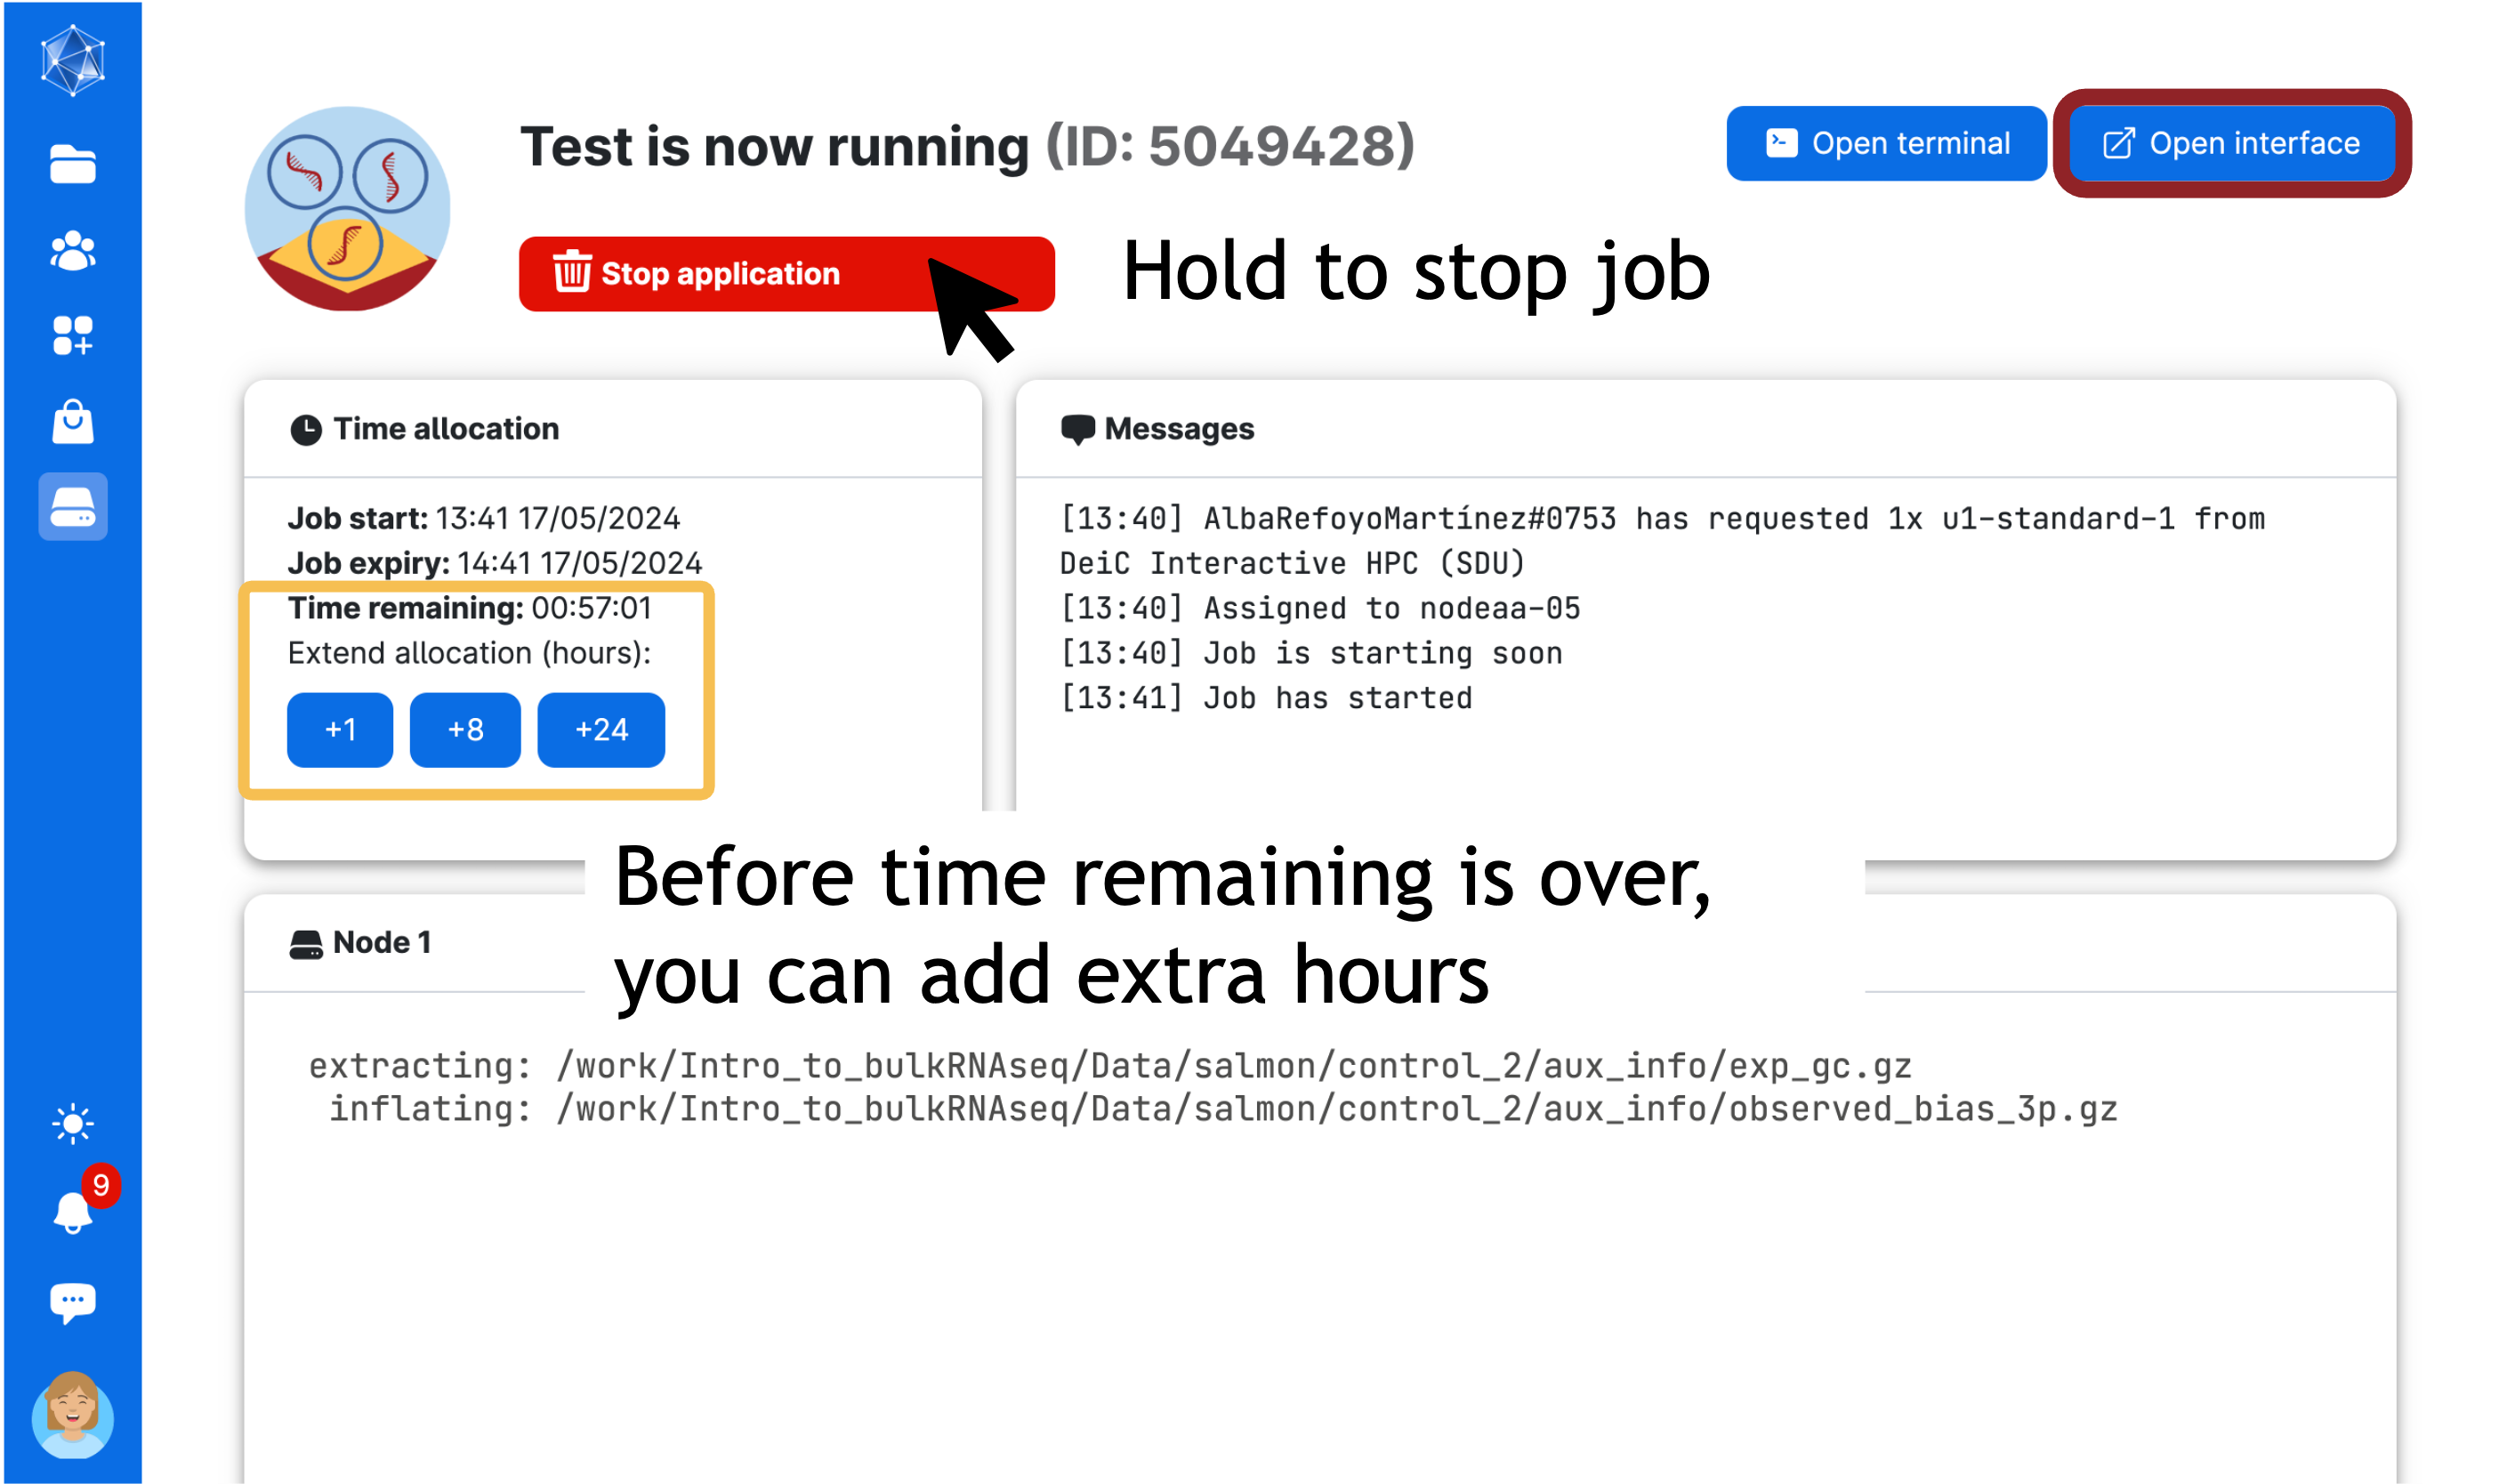
This page will remain open while you work (or you can return to it via Runs in the left panel). You can end your session early by pressing and holding Stop application (red button), you can see how much time you have left and can add hours to your session as you go (blue buttons in orange square).
Step 6
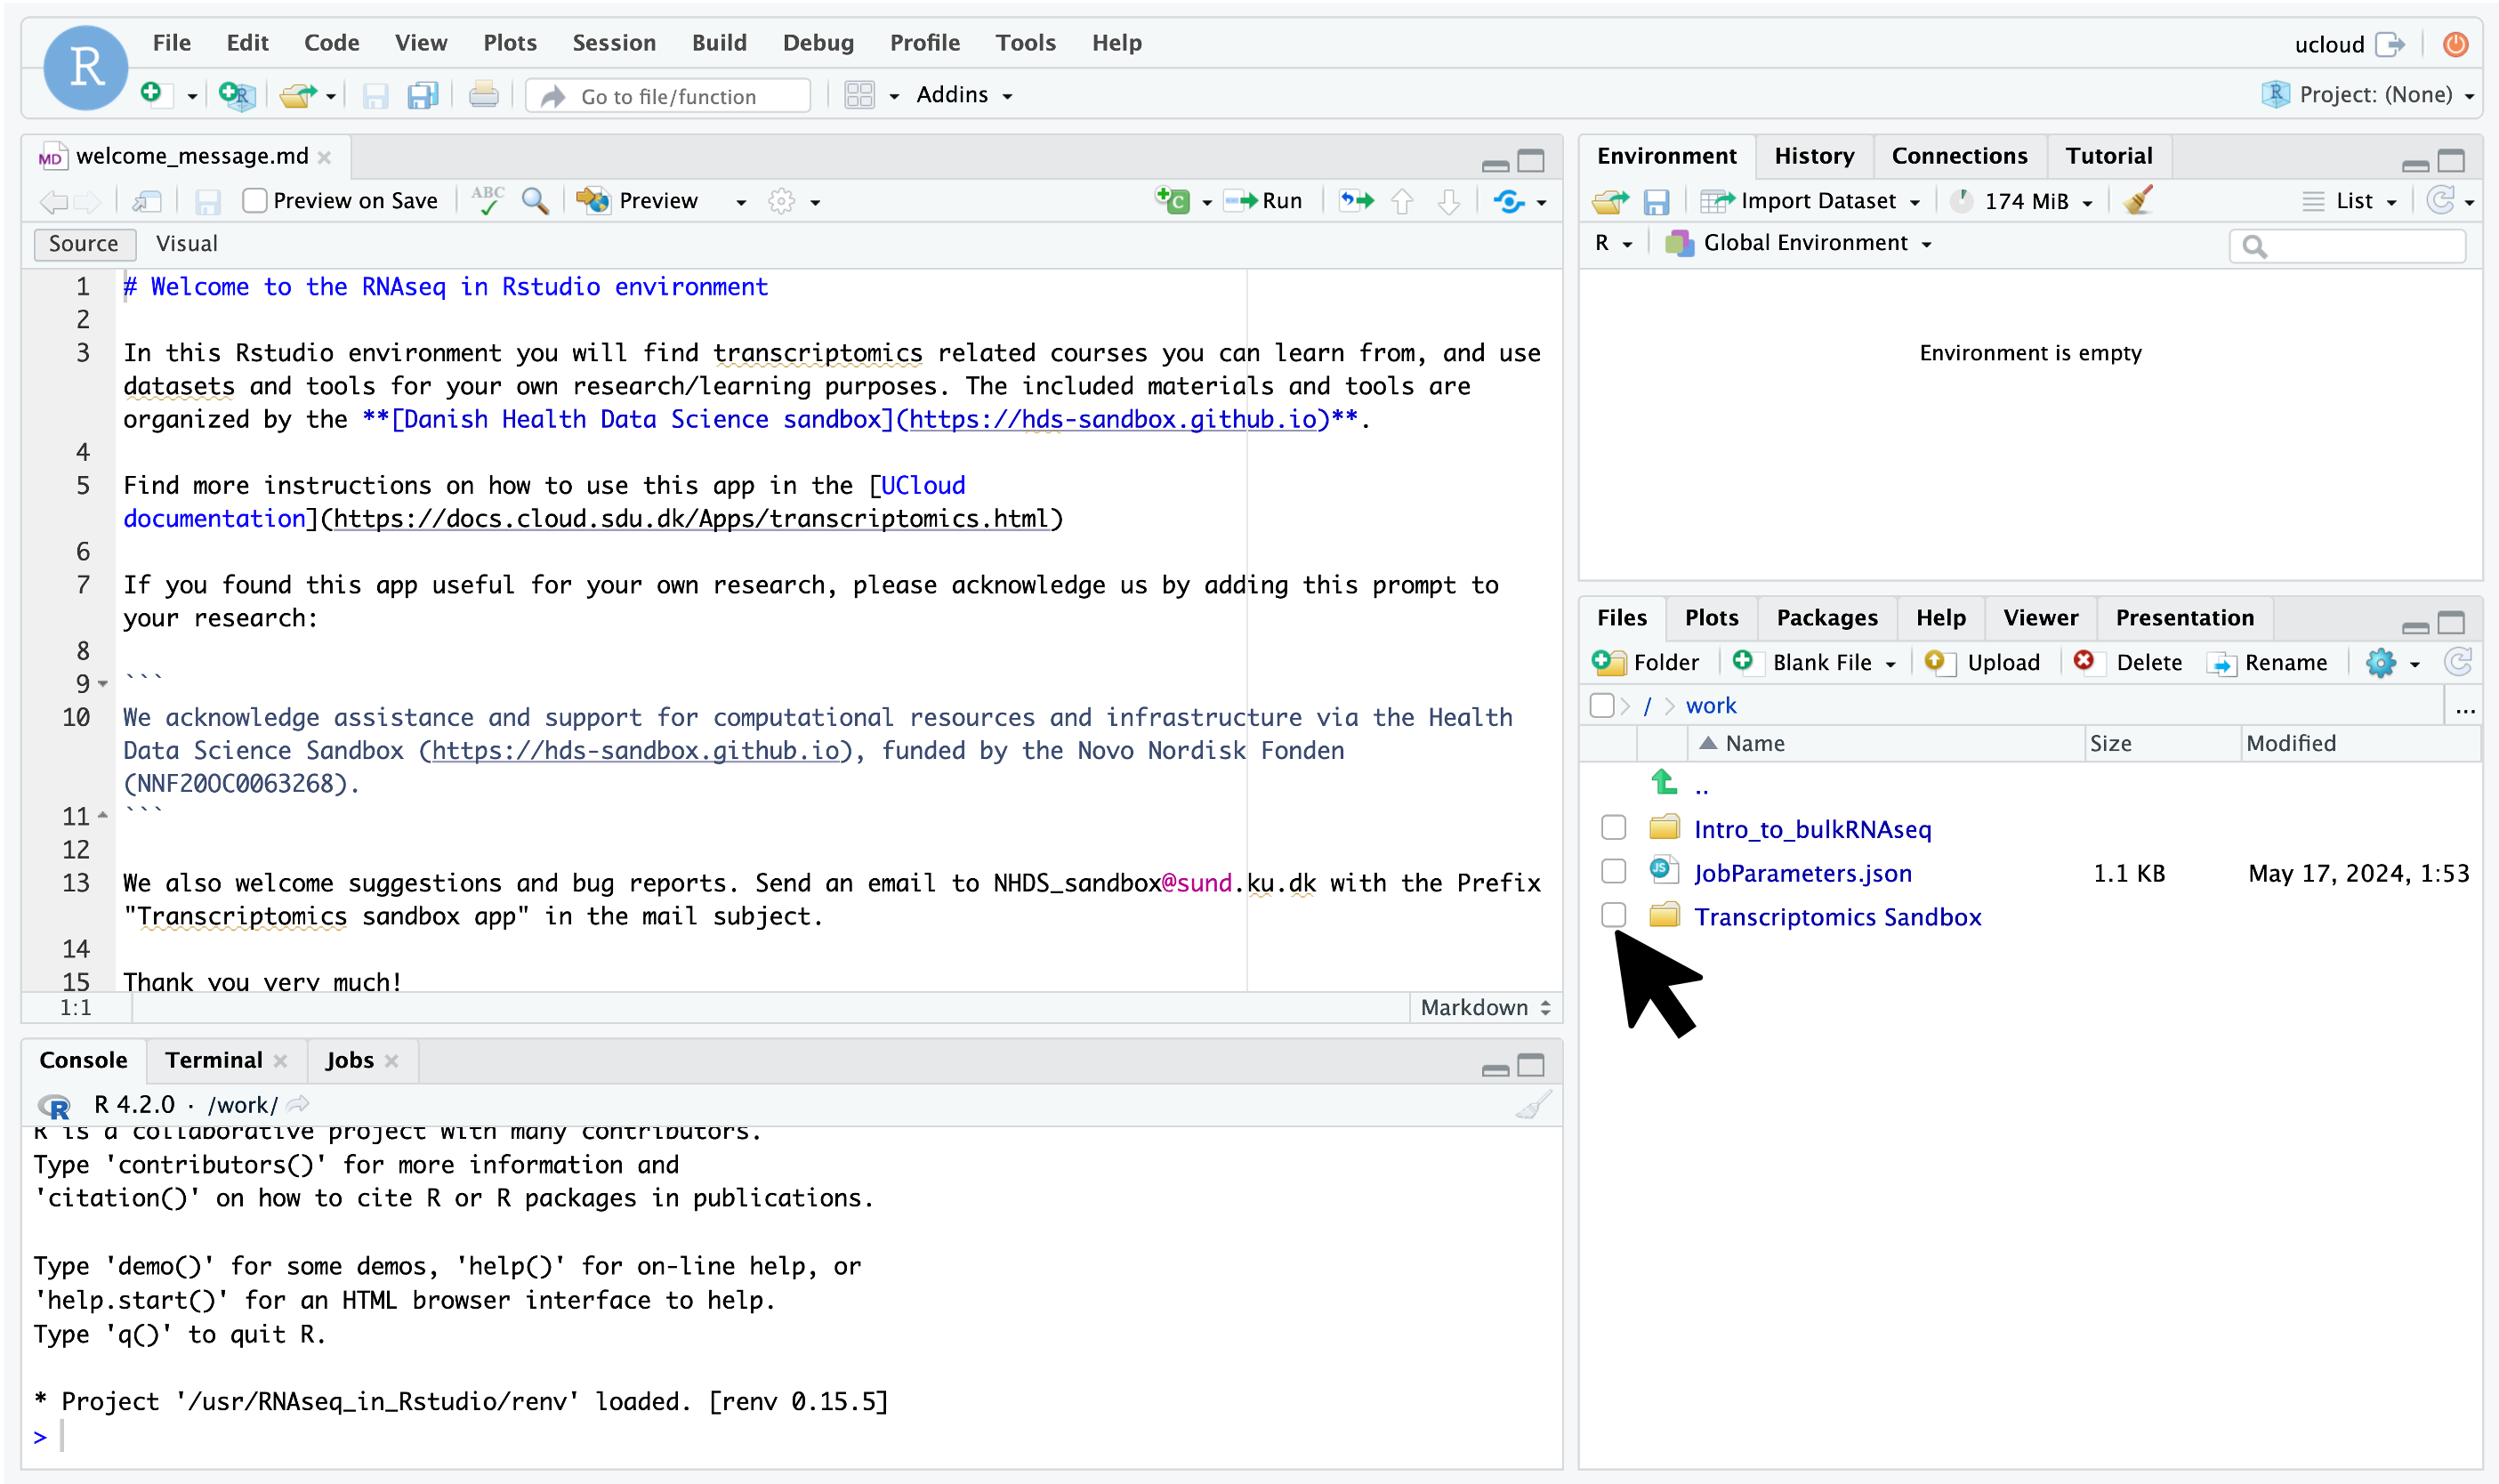
Different apps might employ distinct development environments, so your interface experience could vary accordingly. If you’re utilizing an RStudio-based application, like the transcriptomics tool, your interface will launch in a new tab, resembling the image provided below. Simply navigate through the folders to locate and access the R Markdown notebooks.
If you are testing a JupyterLab-based application, such as the genomic app, your interface should look like in the image below. In this case, you will be working from JupyterLab. You can open Jupyter Notebooks (yellow square), R studio (blue square) or a terminal (black square) among others. In this case, the highlighted buttons (under Notebooks) have all the software and packages that you will need pre-installed (this is not the case with Python 3 to the left).

You can navigate through the different folders and start running the Python notebooks (orange square).

If you are an advanced user, you can also create your own Python files and select the Kernel NGS (python) to use the pre-installed software. Learn how to manage (upload and download new data) and share files that you have created/developed with collaborators here.
Create your own directories to save the output of your jobs. You will be able to access them later in your project folders under the resources you are using
If you haven’t created any directories, look for the generated files under a folder with the same name as the job name you used.
You are ready to start using Ucloud and the sandbox tools!