Managing data
Let’s start with some practical exercises focused on implementing tools that will help you with the collect & document data life cycle phase.
Data structure with cookiecutter
Establishing a consistent file structure and naming conventions will help you efficiently manage your data. We will classify your data and data analyses into two distinct types of folders to ensure the data can be used and shared by many lab members while preventing modifications by any individual:
- Data folders: store raw and processed datasets, the workflow/pipeline used, data provenance, and quality control reports. These folders should be locked and read-only to prevent changes, with MD5 checksums used to verify data integrity.
- Project folders: contain all necessary files for a specific research project (scripts, results, intermediate files, etc.)
Setting up folder templates
Creating a folder template is straightforward with cookiecutter a command-line tool that generates projects from templates (called cookiecutters). You can do it from scratch (see Bonus) or opt for one of our pre-made templates available as a Github repository (recommended for this workshop).
Let’s give it a try!
If you haven’t yet, please submit a new job to UCloud, mounting your personal drive and using the initialization script provided by the course instructors. Follow to the guidelines in UCloud job setup.
Once the job is ready, run conda activate hpclab-env in the terminal to access all the required pre-isntalled software.
- Use our cookiecuter-template and fill-up the variables
Terminal
cookiecutter https://github.com/hds-sandbox/cookiecutter-template- Explore the project structure (e.g.,
ls -l)
You’re ready to customize your own template! Explore the following folder structure and the types of files you might encounter. How does it compare to your own setup?
Project folder structure
<project>_<keyword>_YYYYMMDD
├── data                    # symlinks or shortcuts to the actual data files
│  └── <ID>_<keyword>_YYYYMMDD
├── documents               # docs and files relevant to the project
│  └── research_project_template.docx
├── metadata.yml            # variables or key descriptors of the project or data
├── notebooks               # notebooks containing the data analysis
│  └── 01_data_processing.rmd
│  └── 02_data_analysis.rmd
│  └── 03_data_visualization.rmd
├── README.md               # detailed description of the project
├── reports                 # notebooks rendered as HTML/PDF for sharing
│  └── 01_data_processing.html
│  └── 02_data_analysis.html
│  ├── 03_data_visualization.html
│  │  └── figures
│  │  └── tables
├── requirements.txt // env.yaml # file listing necessary software, libs and deps
├── results                 # output from analyses, figs and tables
│  ├── figures
│  │  └── 02_data_analysis/
│  │    └── heatmap_sampleCor_20230102.png
│  ├── tables
│  │  └── 02_data_analysis/
│  │    └── DEA_treat-control_LFC1_p01.tsv
│  │    └── SumStats_sampleCor_20230102.tsv
├── pipeline                # pipeline scripts
│  ├── rules // processes
│  │  └── step1_data_processing.smk
│  └── pipeline.md
├── scratch                 # temporary files or workspace for dev
└── scripts # other scripts If you haven’t created a GitHub account or are not comfortable using it yet, you can skip step 1 in Exercise 2 (below). In step 2, use the sandbox URL instead of your owned forked repo by running the following command:
Terminal
git clone https://github.com/hds-sandbox/cookiecutter-templateIf you have a GitHub Desktop, click Add and select Clone repository from the options.
You will first fork our Sandbox repository, and then clone it to UCloud. This allows you to customize the template to fit your specific needs, rather than strictly following our example, and save the changes back to your repository.
Go to our Cookicutter template and click on the Fork button at the top-right corner of the repository page to create a copy of the repository on your own GitHub account.
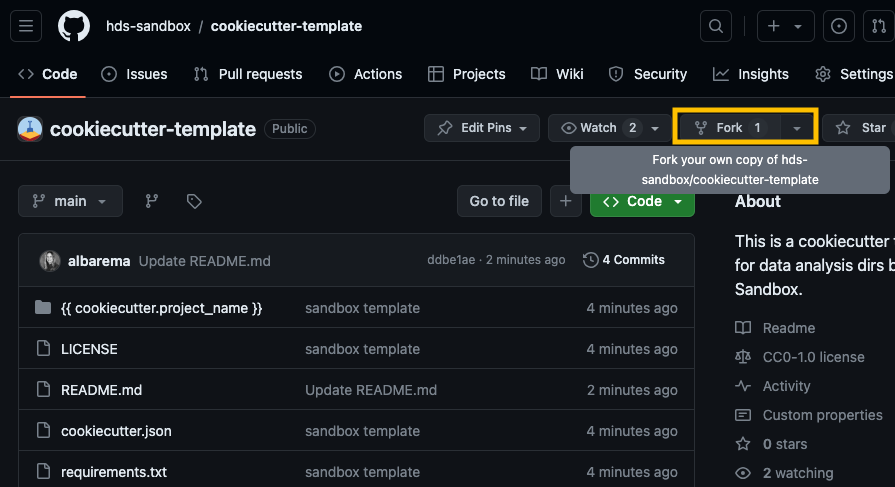
fork_repo_example Open the Coder app on UCloud (locally, if you don’t have access), copy the URL of your fork and clone the repository to your personal drive on UCloud (the URL should look something like https://github.com/your_username/cookiecutter-template):
git clone <your URL to the template>Access the cloned repository (
cd cookiecutter-template) and navigate through the different subdirectories.The Cookiecutter template you just cloned is missing the
reportsdirectory and therequirements.txtfile. Create these, along with a subdirectory namedreports/figures.│... ├── reports/ │ ├── figures/ ├── requirements.txt
Here’s an example of how to do it. Open your terminal and navigate to your template directory
cd \{\{\ cookiecutter.project_name\ \}\}/
mkdir reports
touch requirements.txt
...
Feel free to customize the template further to fit your project’s requirements. You can change files, add new ones, remove existing ones or adjust the folder structure. For inspiration, review the data structure under ‘Project folder structure’ above.
- Utilize the template
Terminal
cookiecutter cookiecutter-templateThe command cookiecutter cookiecutter-template will initiate an interactive prompt. Fill up the variables and verify that the new structure (and folders) looks like you would expect. Have any new folders been added, or have some been removed?
Example bash commands
# Assuming the name of the project is 'myproject_sep24'
ls -l myproject_sep24
Optional (for those already familiar with git and GitHub)
The following steps enable version control and make it easy to share the structure with other members of your lab.
- Commit and push changes when you are done with your modifications.
- Stage the changes with
git add. - Commit the changes with a meaningful commit message
git commit -m "update cookicutter template". - Push the changes to your forked repository on Github
git push origin main(or the appropriate branch name).
- Use cookiecutter on the new template!
cookiecutter <URL to your GitHub repository "cookicutter-template">
If you’ve completed the tasks quickly and have time left, feel free to tackle the optional final exercise.
Create a template from scratch using this tutorial scratch. Your template can be as basic as the example provided or include a data folder structure with directories for raw data, processed data, and the pipeline used for preprocessing.
my_template/
|-- {{cookiecutter.project_name}}
|   |-- main.py
|-- tests
|   |-- test_{{cookiecutter.project_name}}.py
|-- README.md- Step 1: Create a directory for the template (like the one above).
- Step 2: Write a cookiecutter.json file with variables such as project_name and author.
{
  "project_name": "MyProject",
  "author_name": "Your Name",
  "description": "A short description of your project"
}- Step 3: Set up the folder structure by creating subdirectories and files as needed.
- Step 4: Incorporate cookiecutter variables in the names of files (
test_{{cookiecutter.project_name}}.py). - Step 5: Use cookiecutter variables within scripts opr metadata files (e.g., such as printing a message that includes the project name or the metadata file gets automatically populated with the cookiecutter variables),
Naming conventions
A well-structured naming system keeps files organized, easy to search, compatible across different systems, and useful for collaboration.
Regular expressions are an incredibly powerful tool for string manipulation. We recommend checking out RegexOne to learn how to create smart file names that will help you parse them more efficiently.
Which of the regexps below match ONLY the filenames shown in bold?
- rna_seq/2021/03/results/Sample_A123_gene_expression.tsv
- proteomics/2020/11/Sample_B234_protein_abundance.tsv
- rna_seq/2021/03/results/Sample_C345_normalized_counts.tsv
- rna_seq/2021/03/results/Sample_D456_quality_report.log
- metabolomics/2019/05/Sample_E567_metabolite_levels.tsv
- rna_seq/2019/12/Sample_F678_raw_reads.fastq
- rna_seq/2021/03/results/Sample_G789_transcript_counts.tsv
- proteomics/2021/02/Sample_H890_protein_quantification.TSV
rna_seq.*\.tsv
.*\.csv
.*/2021/03/.*\.tsv
.*Sample_.*_gene_expression.tsv
rna_seq/2021/03/results/Sample_.*_.*\.tsv
Documentation
Explore the examples below and consider how effectively the README files communicate key information about the project. Some links point to README files describing databases, while others cover software and tools.
How does your documentation compare to these?
Done for today!