Accessing the NGS summer school on GenomeDK
If you are using GenomeDK, you have two options. One is to use a pre-packaged Docker container, which contains jupyterlab and the necessary packages to run all the notebooks. GenomeDK comes with singularity, which can import and execute Docker containers and is able to ensure full reproducibility of the analysis. The second option is to download the github repository of the course and create your own conda environment: this solution works also on any computing cluster where you can have conda installed and is shown in the page dedicate to the access with any computing cluster.
if you do not yet have an account on GenomeDK, please get one Click on this link to get to the account request. and follow the instructions for the 2-factor authentication.
you need to have (or be part of) an active project on GenomeDK. This ensures you can get some computing resources to run the course material. Follow these instructions to request a project.. Please do not create a project only to run this course, but use an existing project folder.
In Windows and the Powershell command line, commands might need
.exeat the end, such asssh.exeinstead ofssh. Newer versions of Windows do not require that, though.
Singularity container
1. Log into the cluster using the command line, and substituting USERNAME with your actual user name:
ssh USERNAME@login.genome.au.dkand be sure to run those two commands to remove space-filling cache data, which can make everything slower after a few times you run tutorials
rm -rf ~/.apptainer/cache/*
rm -rf ~/.singularity/cache/*
2. Get into a folder inside your project, for example
cd MYPROJECT/ngsSummerSchoolDo not work directly in your home folder /home/username, as this has a limit of 100GB of space available. Work instead inside a previously established project folder.
3. Use singularity to download the container of the course. This will take some time and show a lot of text, and at the end a file called course.sif is created into the folder.
singularity pull course.sif docker://hdssandbox/ngssummerschool:2024.07You need to do this step only once!
4. Activate tmux: this will make things run in backround. If you lose your internet connection, the course material will still be up and running when the connection is back on your pc! Use the command
tmuxThe command line will change a bit its aspect. Now it’s time to get a few resources to run all the material. We suggest one CPU and 32GB of RAM for the first three modules, and 2 CPUs and 64GB of RAM for the single-cell analysis. For the first configuration suggested, for example, you get resources using
srun --mem=32g --cores=1 --time=4:0:0 --account=MYPROJECT --pty /bin/bashNote you always need your project name, and you can also choose for how long you want the resources to be available to you. Asking for resources means waiting for some time in a queue before they are assigned.
In the example above time is 4 hours. After this time, whatever you are doing will be closed, so be sure to save your work in progress.
5. execute the container with
singularity exec course.sif /bin/bashNote that the command line shows now Apptainer> on its left. We are inside the container and the tools we need are now available into it.
6. Now we need to run a configuration script, which will setup the last details and execute jupyterlab. If a folder called Data exists, it will not be downloaded again (also meaning that you can use our container with your own data folder for your own analysis in future)
git config --global http.sslVerify false
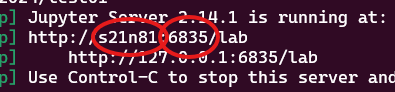
wget -qO- https://raw.githubusercontent.com/hds-sandbox/NGS_summer_course_Aarhus/docker/scripts/courseMaterial.sh | bash7. You will see a lot of messages, which is normal. At the end of the messages, you are provided two links looking as in the image below. Write down the node name and the user id highlighted in the circles.
Wrote down node and ID? Last step is to create a tunnel between your computer and genomeDK to be able to see jupyterlab in your browser. Now you need to use the node name and the user id you wrote down before! Open a new terminal window on your laptop and write
ssh -L USERID:NODENAME:USERID USERNAME@login.genome.au.dkwhere you substitute USERID and NODENAME as you wrote down before, and then USERNAME is your account name on GenomeDK. For example ssh -L 6835:s21n81:6835 samuele@login.genome.au.dk according to the figure above for a user with name samuele.
8. Open your browser and go to the address http://127.0.0.1:USERID/lab, where you need your user id again instead of USERID. For example http://127.0.0.1:6835/lab from the figure above. Jupyterlab opens in your browser.
9. Now you are ready to use JupyterLab for coding. Use the file browser (on the left-side) to find the folder Notebooks. Select one of the four tutorials of the course. You will see that the notebook opens on the right-side pane. Read the text of the tutorial and execute each code cell starting from the first. You will see results showing up directly on the notebook!

Right click on a notebook or a saved results file, and use the download option to save it locally on your computer.
What if my internet connection drops?
Now worries, tmux kept your material up and running. You only need a new terminal window to run the tunneling
ssh -L USERID:NODENAME:USERID USERNAME@login.genome.au.dkas you did before, so you can continue working!
Recovering the material from your previous session
Do you want to work again on the course material, or recover some analysis? Everything is saved in the folder you were working in. Next time, follow the whole procedure again (without step number 3.) and you can be up and running the course in no time.