Containers: Apptainer
Containers are typically used to package applications along with all their dependencies, making them portable and reproducible across different environments. For example, Bioinformatics tools that require complex dependencies or lengthy installations can be distributed as containers, removing the need for manual setup.
Many containers are built using Docker, a widely used container platform. However, Docker is not available on HPCs. Instead, HPCs like GenomeDK, provide Apptainer, which can run containers originally built for Docker. This makes it very practical to pull and integrate containers directly into analysis workflows.
The aim of these exercises is to understand how to run containerized software.
There are several repositories where you can find pre-built containers:
- Biocontainers: community-driven initiative to containerize bioinf softwares (x100K+ container images available)
- bioconda package index lists all software versions and how to run it as containers
- DockerHub registry: Public hub for Docker images, often including official containers from software developers
- Quay: another registry similar to DockerHub.
- NVIDIA GPU Cloud
- **Singularity Cloud Library


Apptainer/Singularity was specifically designed for HPC platforms; however, the UCloud server does not support it for regular users.
Select GenomeDK, where you can directly run existing Apptainer containers for the exercises. IF you haven’t created an account on GenomeDK, you have two options:
- Go to the next section (recommended): Containers - Docker
- Run apptainer locally -> click on the computer icon.
Apptainer (formerly Singularity) was specifically designed for High Performance Computing (HPC) environments. First, we’ll walk through the initial setup needed to get started.
Practical setup
It’s important to configure a few settings that will automatically be applied each time you log in. Apptainer uses a cache directory to store downloaded container images and related files. By default, this cache is located in your home directory ( ~/.apptainer). Since HPC home directories often have limited storage, this cache can quickly fill up and cause issues.
To avoid this, we recommend configuring a temporary directory with more available space for Apptainer to use. Add the code below to ~/.bashrc (use nano ~/.bashrc or any editor you want).
~/.bashrc
mkdir -p -m 700 /tmp/$USER
export APPTAINER_TMPDIR=/tmp/$USER
export APPTAINER_CACHEDIR=/tmp/$USER
When creating directories for container use, the -m 700 option with the mkdir command ensures that only you have access to the files inside. This is particularly important when working with containers that may include passwords or other sensitive data. By restricting permissions, you prevent other users from accessing your files (/tmp/ is a public folder)!
Now, create a folder called containers101 in the pipesOut directory.
mkdir -p pipesOut/containers101
cd pipesOut/containers101Always start an interactive SLURM session before running any Apptainer commands. Do not run Apptainer on the login node. srun --account DeiC-KU-L65 -t 00:00:45 --pty bash
Alternatively, you can submit a SLURM batch job instead of using an interactive session.
mybash.sh
#!/bin/bash
#SBATCH --account my_project
#SBATCH -c 1
#SBATCH --mem 1g

# COMMANDS HEREGo to the Biocontainer Registry and search for a bioinformatics tools you are familiar with. - If you are unsure, look for the minimap2 aligner. - Open the container page and explore the documentation. - Identify how the software is typically executed inside a container.
Some software docs will suggest to run immediately the container with apptainer run, but we will instead download it first (pull) and then run it.
Let’s download the image from minimap2:
apptainer pull minimap2.sif https://depot.galaxyproject.org/singularity/minimap2:2.28--h577a1d6_4This command downloads the container into your current directory, and saves it as minimap2.sif (better name than the default minimap2:2.28--h577a1d6_4). There are two ways of running the container, let’s explore both.
You can launch the container, using the run command, which opens a CLI inside the environment. From there, you can manually execute the program and run other commands.
- Start the container and enter its environment
- List the contents of the working directory
- Create an empty file named
test.txtin the current directory - Verify the file was created. How many files are there now?
- Check the version of minimap2:
- Exit the container
Alternatively, you can run the container in a non-interactive way. For workflows and pipelines, it is often more practical to execute commands directly:
apptainer run minimap2.sif minimap2- This runs minimap2 immediately and exist immediately after the command has run
- No interactive session is opened
- This approach is ideal for scripting and pipelines
Run the same commands from the exercise above but now in a non-interactively manner.
- Print minimap2 version using the
exec - Delete the
test.txtfile - How many files are there now?
When to use each:
run: when testing or exploring a container. It will execute a runscript if one is defined for that container.exec: in pipelines, scripts, and HPC jobs (this is the most common in practice)
Apptainer - interactively
# Launch container
apptainer run minimap2.sif

# Run commands
ls
touch test.txt
ls | wc -l
minimap2 --version
exit
Apptainer - non-interactive
apptainer exec minimap2.sif minimap2 --version
apptainer run minimap2.sif rm test.txtIn this exercise, we will utilize the fastmixture Docker image, which is available on DockerHub, the repository for Docker images. To enhance the learning experience, we have chosen a simple genomics analysis, an efficient software tool, Fastmixture, and a sample dataset. Focus on executing the commands, ensuring that this approach is easily adaptable to your own projects and software needs.
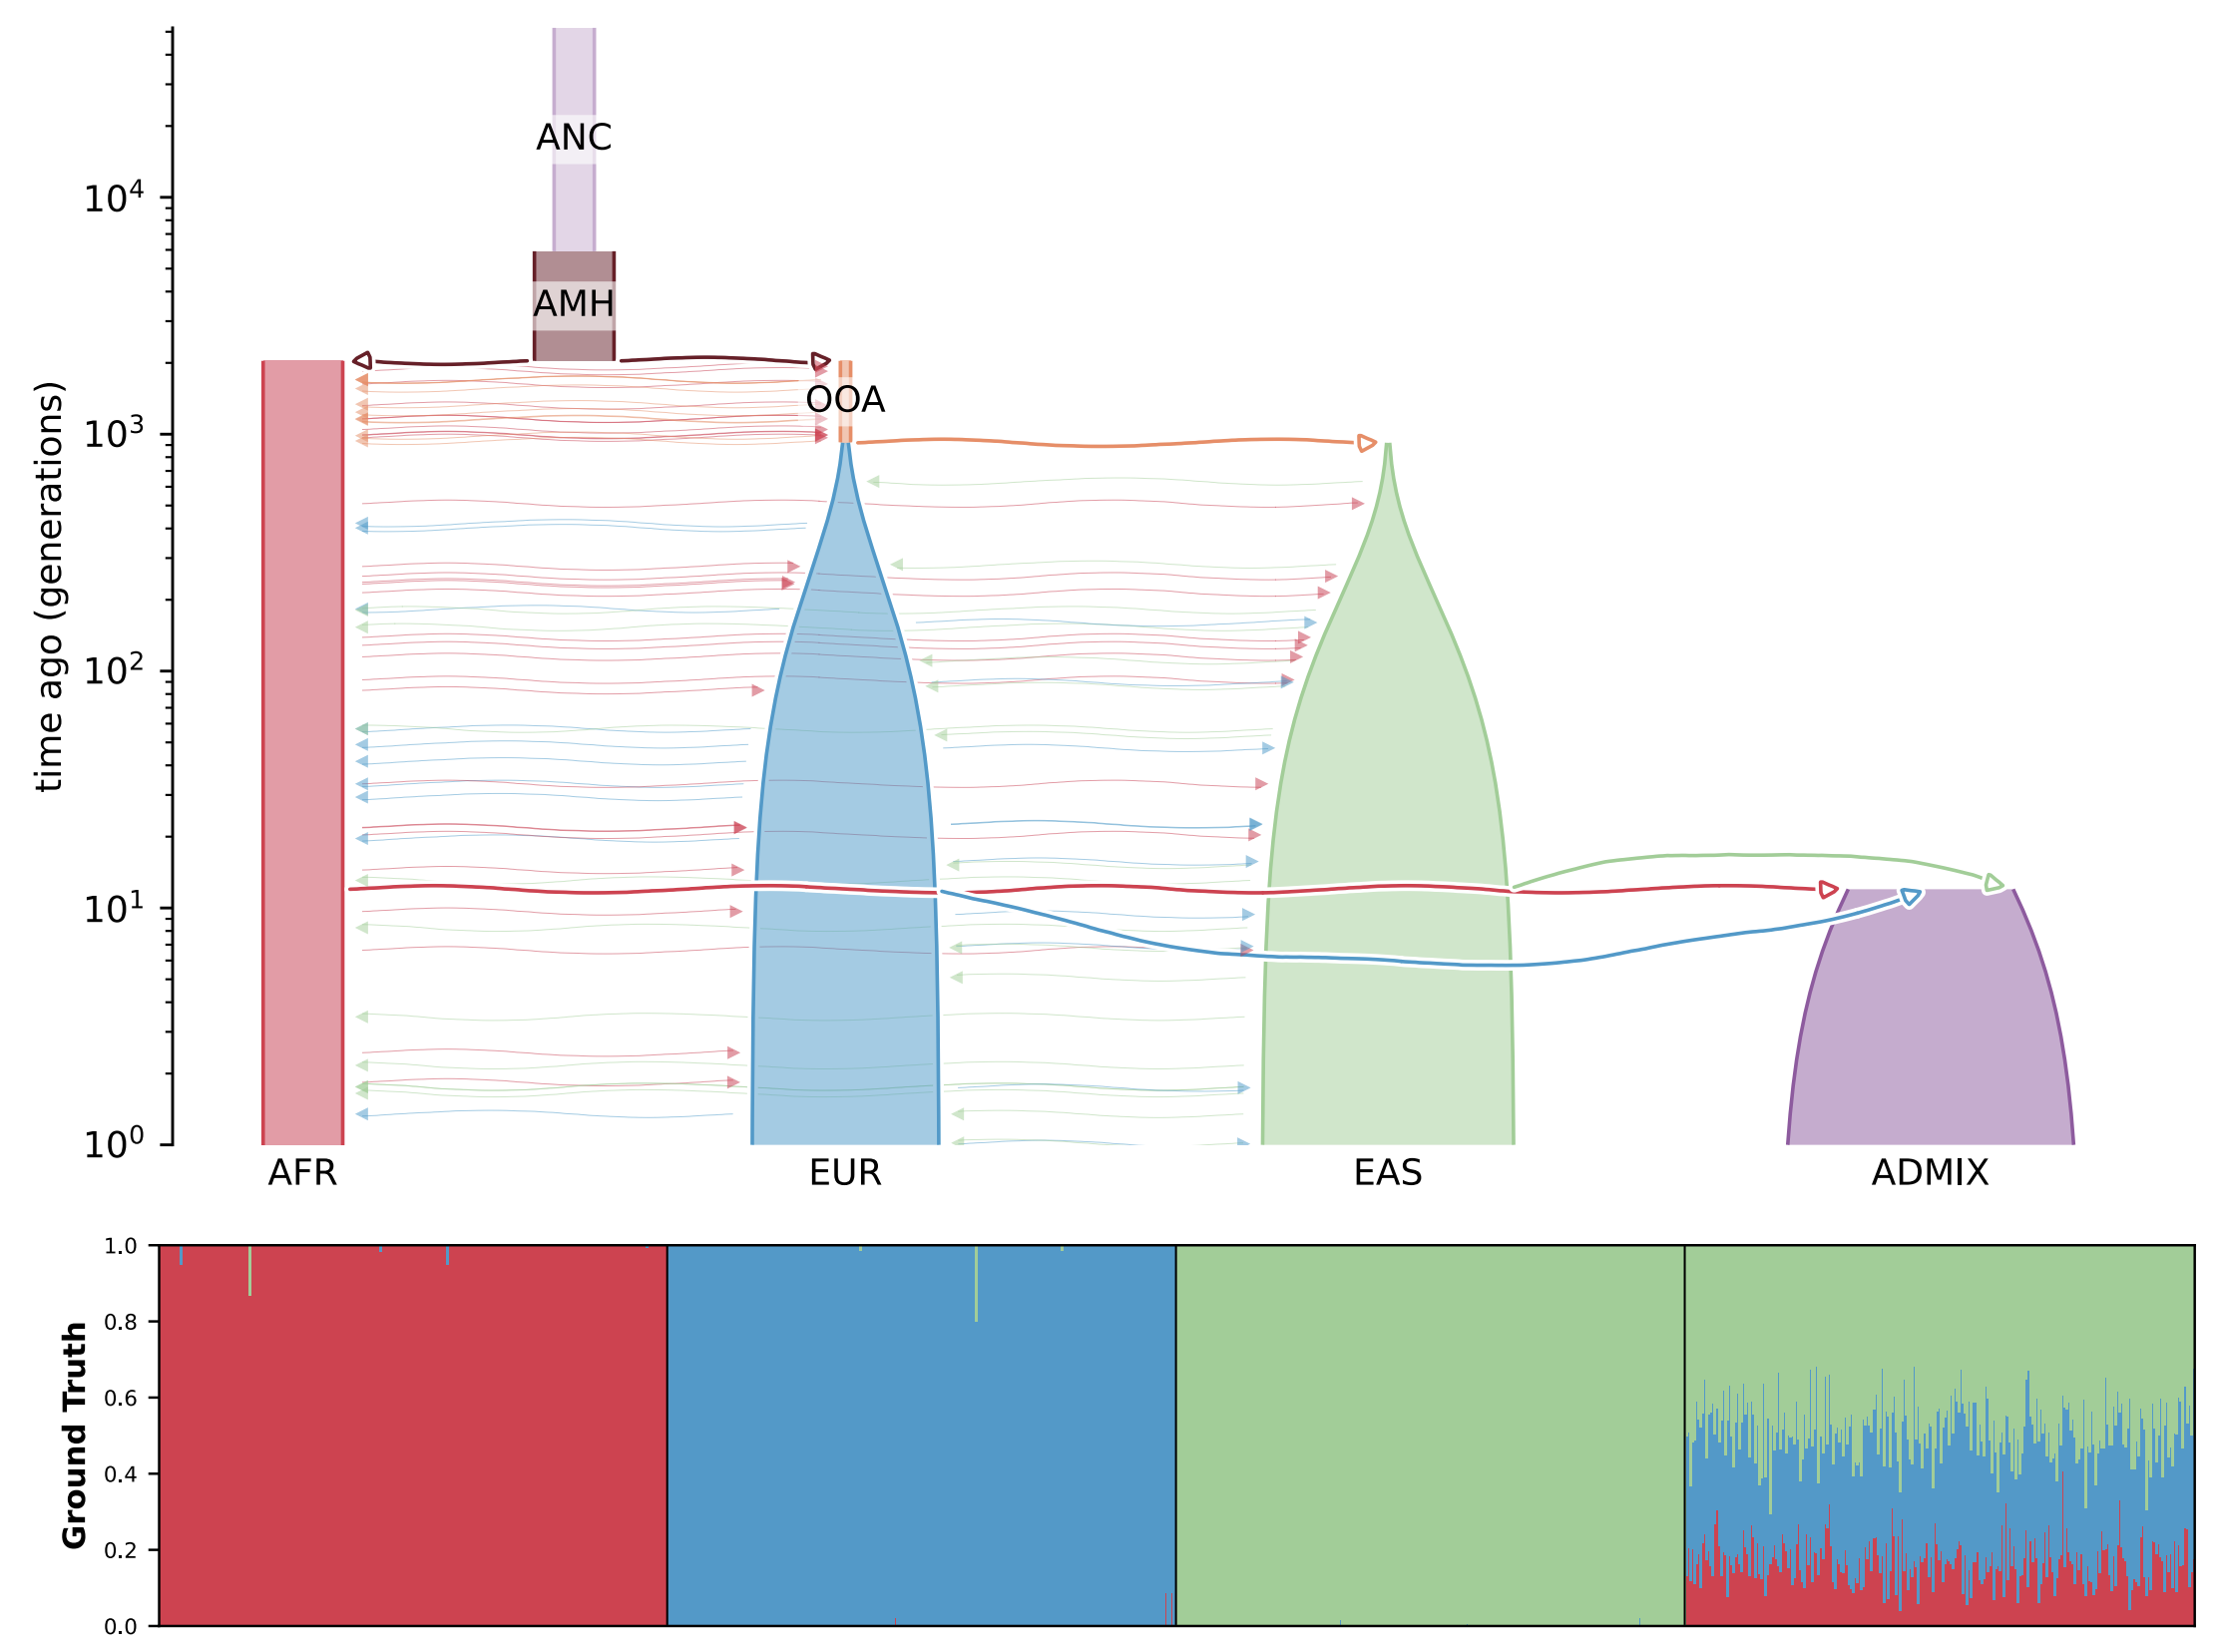
Fastmixture is a software designed to estimate ancestry proportions in unrelated individuals. It analyses genetic data to determine the percentage of various ancestral backgrounds present in a given individual. This tool is essential for understanding demographic histories and modeling population structure. You can view the results of running such analyses in the figure below.
Here are some optional resources you might typically review before running the software (though not required for this exercise):
- Santander, C.G., Refoyo Martinez, A. and Meisner, J., 2024. Faster model-based estimation of ancestry proportions. Peer Community Journal, 4 link to paper
- Software GitHub repository link
Pull
fastmixtureimage from DockerHub and save it locally as fastmixture.sif. Make sure to pull the latest versionThe input data:
pipes/data/toyCreate a folder for the output:
mkdir -p toyRun a command to display the
fastmixtureversion and enter the version number:Run
fastmixturesoftware using the command below. We will set K to 3 because there are three populations (clusters) in our PCA analysis (exploratory analysis). Both--bfileand--outrequire the prefix of a filename, so do not include the file extension. If you have checked the toy folder, you will find the files namedtoy.data.*; therefore, use--bfile toy.dataIn
fastmixture, the main arguments used in this exercise are:--K: Specifies the number of ancestral components, representing the sources in the mixture model.--seed: Sets the random seed to ensure reproducibility of the analysis across different runs.--bfile: prefix for PLINK files (.bed, .bim, .fam).--out: Prefix output name.
fastmixture --bfile <input.prefix> --K 3 --threads 4 --seed 1 --out <output.prefix>Do you have the results in the toy folder?
You should look for files named toy.fast.K3.s1.{ext}, where {ext}=["Q", "P", "log"].
# Pull image
apptainer pull fastmixture.sif docker://albarema/fastmixture

# Create a folder for the output files
mkdir -p toy

# Check version
apptainer exec fastmixture.sif fastmixture --version

apptainer exec fastmixture.sif fastmixture --bfile /PATH/TO/toy/toy.data --K 3 --out toy/toy.fast --threads 8

ls toy
Bonus exercises
You will get to test other containerised tools, for example:
Alternatively, explore one of the container image repositories and select a tool that you use regularly. Once you have pulled an image, we recommend starting by running the --help command, as all software has one. This command displays the help documentation of the program, verifying that our image is functioning correctly and includes the intended software.
You can also choose to: - Build your own container
Don’t hesitate to ask for help if needed!
You can also pull and run a container from DockerHub. Let’s try to do so using the biocontainers/bwa-mem2 container, choose the tag v1.9-4-deb_cv1. We will use samtools to view and convert BAM files. Once the image is saved in your wd, use the container to:
- Save image as
samtools_docker.sif - Read a
.bamfile from an URL (https://github.com/roryk/tiny-test-data/raw/refs/heads/master/wgs/mt.sorted.bam) - Use samtools to read the file and save it locally into BAM format (using the
-hflag to ensure the header is included, and the-Oto choose the BAM format as input) - Save the output to a new file called
test01.bam - Does your bam file look like this (see below)?
198d4514-09bb-4f68-bdec-15f2699d3fb9 163 chr1 630214 0 101M 630449 336 CAGTTCTACCGTACAACCCTAACATAACCATTCTTAATCTAACTATTTATATTATCCTAACTACTACCGCATTCCTACTACTCAACTTAAACTCCAGCACC <@B?@AB@@B:@@A@CABCC@CAAAADACAABCCBAA?CCADACAACBAAAACAACCDBDBDABCAAC;CAABCCDABCABDCADBDCBDCBDD?ADCAB? NM:i:1 MD:Z:38T62 MC:Z:101M AS:i:96 XS:i:96 XA:Z:chrM,+5044,101M,1;Check the samtools documentation
samtools view -h <bamfile> -O bam Use samtools view to check the first 1-2 lines of the file.
You can find the image path: https://hub.docker.com/r/biocontainers/samtools.
# Pull image as .sif
apptainer pull samtools_docker.sif docker://biocontainers/samtools:v1.9-4-deb_cv1
# Run samtools
apptainer exec samtools_docker.sif \
                samtools view \
                -h https://github.com/roryk/tiny-test-data/raw/refs/heads/master/wgs/mt.sorted.bam \
-O bam > test01.bamBLAST - Build a BLAST protein database from zebrafish protein sequences.
Zebrafish is a widely used model organism in genetics. This small dataset will facilitate quick results, allowing us to focus on how to run different bioinformatics tools so that you can easily adapt the commands in future projects.
- Download a BLAST container
- Explore how to run BLAST tools
- Download a reference dataset (zebrafish proteins)
- Prepare it as a BLAST database
apptainer pull docker://biocontainers/blast:2.2.31
apptainer run blast_2.2.31.sif blastp -help
mkdir zebrafish-ref
apptainer run blast_2.2.31.sif curl -O ftp://ftp.ncbi.nih.gov/refseq/D_rerio/mRNA_Prot/zebrafish.1.protein.faa.gz
apptainer run blast_2.2.31.sif gunzip zebrafish.1.protein.faa.gz
apptainer run blast_2.2.31.sif makeblastdb -in zebrafish.1.protein.faa -dbtype protYou can build a container directly on genomeDK using apptainer. Create a new project-specific dir, e.g. jupyter-project. The image should include jupyter-notebook, and the python libs, matplotlib, pandas and numpy.
Apptainer supports GPU acceleration, allowing you to run containerized applications that take advantage of NVIDIA GPUs. Pull tensorflow image and test that it works. This takes some time
- https://www.tensorflow.org/install/docker
- https://hub.docker.com/r/tensorflow/tensorflow
# pull image
apptainer pull docker://nvcr.io/nvidia/tensorflow:23.08-tf2-py3

# run the container on GPU node
apptainer run --nv tensorflow_23.08-tf2-py3.sif python3 --version
You will need to install a Linux virtual machine to be able to run Apptainer. Follow the instructions here.
Once you are ready, click on GenomeDK to follow the exercises, but note that the commands must be adapted to run inside a virtual machine. Check the solutions below for an example of how the commands should be modified.
````.bash # on local machine (using LIMA)
cd toy # from data folder
apptainer pull /tmp/lima/fastmixture_latest.sif docker:/albarema/fastmixture apptainer run /tmp/lima/fastmixture_latest.sif fastmixture –bfile toy.data –K 3 –out toy.fast –threads 8 ```